By default, your Learndash and Woocommerce have their own account pages and for the end user that can be a bit of cumbersome experience. Therefore, in this tutorial I’m going to show you how to merge Learndash and Woocommerce account pages in a way that all your important data (courses, orders, account details etc.) can be accessed from one place.
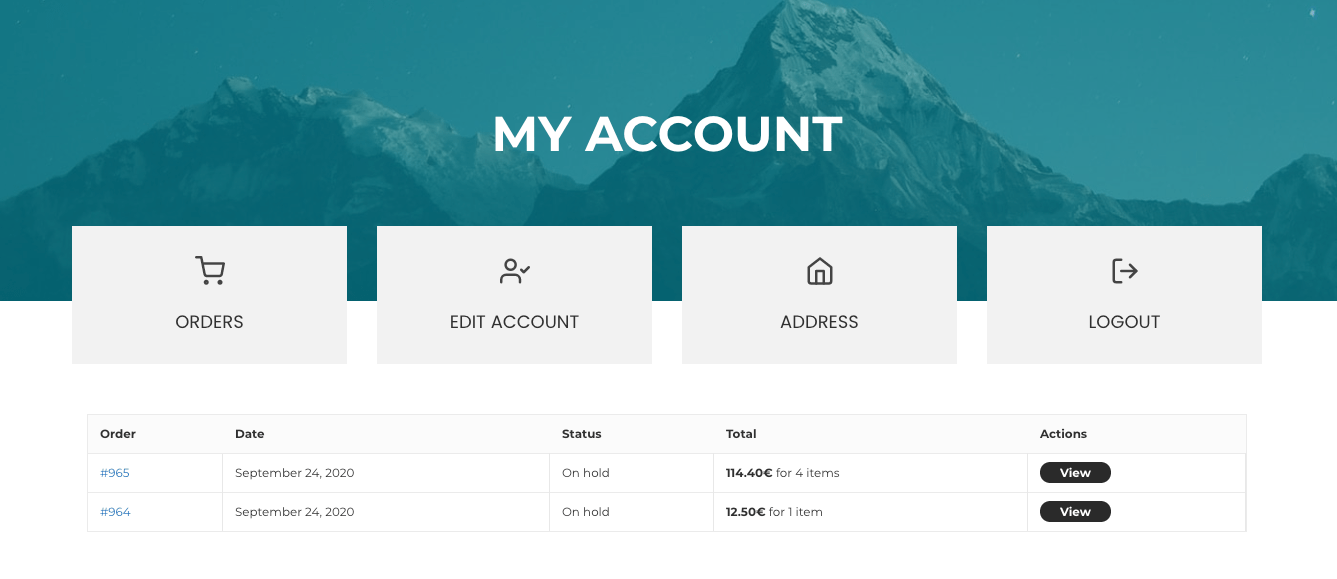
This is what the end result will look like.

Blocksy theme
SAVE 10% COUPON: WPSH10
Kadence theme
SAVE 10% COUPON: SIMPLEHACKS
Video: How to Merge Learndash and Woocommerce Account Pages?
How to Merge Learndash and Woocommerce Account Pages?
Here are the steps you need to take in order to merge Learndash and Woocommerce account pages.
Step 1: Install Code Snippets plugin
Code Snippets plugin is a free plugin which allows your to run PHP/HTML/CSS/JavaScript code snippets on your site without the need to modify functions.php. The plugin can be found here. In this tutorial we are going to use this plugin to add some code snippets.
Another option, paste the code snippets shown below to your child theme’s functions.php file.
Step 2: Add “Courses” endpoint to Woocommerce
Since we need a new endpoint to be shown on the Woocommerce account page, we need to create a new endpoint. So, create a new snippet in Code Snippets and (Snippets >> Add new) paste this code to the code box. Read the explanations inside the snippets.
With the help of this snippet here below I’ll add the Courses endpoint and Courses page to the Woocommerce account page. I want to show all the user courses on the Woocommerce Courses page I‘ going to use the profile shortcode [ld_profile] inside the snippet.
// Add new tab to My Account menu

add_filter ( 'woocommerce_account_menu_items', 'wpsh_custom_endpoint', 40 );
function wpsh_custom_endpoint( $menu_links ){

	$menu_links = array_slice( $menu_links, 0, 5, true )
		// Add your own slug (support, for example) and tab title here below
	+ array( 'my-courses' => 'My courses' )
	+ array_slice( $menu_links, 5, NULL, true );

	return $menu_links;

}
// Let’s register this new endpoint permalink

add_action( 'init', 'wpsh_new_endpoint' );
function wpsh_new_endpoint() {
	add_rewrite_endpoint( 'my-courses', EP_PAGES ); // Don’t forget to change the slug here
}

// Now let’s add some content inside your endpoint

add_action( 'woocommerce_account_my-courses_endpoint', 'wpsh_endpoint_content' ); // If you change your slug above then don’t foget to chagne it alse inside this function
function wpsh_endpoint_content() {

	// At the moment I will add Learndash profile with the shordcode
	echo (
		'<h3>Here are your courses</h3>
	<p>Lorem ipsum dolor sit amet consectetur adipiscing elit facilisis tincidunt, nisi sociosqu lacinia auctor inceptos libero conubia accumsan</p>'
		 );
	echo do_shortcode('[ld_profile]');
}

// NB! In order to make it work you need to go to Settings > Permalinks and just push "Save Changes" button.
Step 3: Change the Woocommerce endpoint order (optional)
Currently the new Courses endpoint is the last one before logout but I want to change the position of this endpoint. Therefore, I‘m going to add this snippet to the Code Snippets. You and customize the order as you find suitable for your site.
// Change Woocommerce endpoint order

add_filter ( 'woocommerce_account_menu_items', 'wpsh_custom_endpoint_order' );
function wpsh_custom_endpoint_order() {
 $myorder = array(
        'dashboard'          => __( 'Dashboard', 'woocommerce' ),
	 	 'my-courses'    => __( 'My courses', 'woocommerce' ), // Don’t forget to change the slug and title here
        'orders'             => __( 'Your orders', 'woocommerce' ),
        'edit-account'       => __( 'Account details', 'woocommerce' ),
	 	'edit-address'       => __( 'Edit address', 'woocommerce' ),
	 	'woo-wish-list'       => __( 'Wishlist', 'woocommerce' ),
        'customer-logout'    => __( 'Log out', 'woocommerce' ),
    );
    return $myorder;
}
Step 4: Redirect user to the Learndash Courses tab after login
I have a modal login on my site header and if someone is logging in he/she will stay on the same page he/she was before login. I want the user to be redirected to My account >> Courses endpoint. And I don’t want this redirection to happen to the administrator or author roles.
So, I’ll add this snippet to the Code snippets. Pay attention thou
function woo_login_redirect( $url, $request, $user ){
if( $user && is_object( $user ) && is_a( $user, 'WP_User' ) ) {
if( $user->has_cap( 'administrator') or $user->has_cap( 'author')) {
$url = admin_url();
} else {
$url = home_url('/my-account/my-courses/'); // HERE GOES THE REDIRECTION URL
}
}
return $url;
}
add_filter('login_redirect', 'woo_login_redirect', 10, 3 );
If previous redirection is not working on your site then try to add this piece of code here below. There are some additional options for you to redirect your user.
add_filter( 'woocommerce_login_redirect', 'learndash_login_redirect', 9999, 2 );
function learndash_login_redirect( $redirect, $user ) {
    if ( wc_user_has_role( $user, 'customer' ) ) {
       // $redirect = get_home_url(); // homepage
       // $redirect = wc_get_page_permalink( 'shop' ); // shop page
       $redirect = '/my-account/my-courses/'; // custom URL same site
        //$redirect = 'https://custom.url'; // custom URL other site
        //$redirect = add_query_arg( 'password-reset', 'true', wc_get_page_permalink( 'myaccount' ) ); // custom My Account tab
    }
    return $redirect;
}
Step 5: Redirect Learndash Edit profile link to Woocommere Edit account link
At this point we already have successfully merged Learndash and Woocommerce account pages but there are some other things to consider. For example, there is a Edit profile link under the Leardash profile avatar and clicking on that link opens up WordPress backend profile.
I don’t like it at all and since I want the user to stay on the My account page and edit his/her account there, I will add this snippet to the Code snippets.
add_filter( 'get_edit_user_link', function( $link, $user_id ) {
	$link = "/my-account/edit-account/"; // HERE GOES THE EDIT ACCOUNT ENDPOINT URL
	return $link;
}, 30, 2 );
Step 6: Create a new nice looking My account dashboard
I have written a full tutorial how to customize you Woocommerce account page with customizer. Or with Elementor. Take a look at this post here.
The end result will be something like that. You just need to add Courses link and customize the look to your needs.
Step 7: Remove old Woocommerce my account dashboard navigation
So, you have created a new dashboard but the old navigation links are still there on the sidebar? Well, in order to customize your Woocommerce my account dashboard there is one more thing you need to do. And that means removing this navigation.
Therefore, go to Appearance >> Customizer >> Additional CSS and add this bit of a CSS code.
.woocommerce-MyAccount-navigation {
display:none;
}
.woocommerce-account .woocommerce-MyAccount-content {
    width: 100%;
}
This bit of a code will remove the old navigation links and set the content to be shown in 100% width.
Bonus Tips on How to Merge Learndash and Woocommerce Account Pages
Below are two additional bonus tips on how to merge Learndash and Woocommerce account pages. This will make your users end experience a bit better.
Bonus tip 1: Disable Woocommerce logout confirmation
By default, Woocommerce won’t log you right out but instead it asks the confirmation whether you really want to do it. I find this annoying and therefore I usually disable it with this small piece of code here below. Add it to the Code snippets and you’re good to go.
function bypass_woo_logout_confirmation() {
    global $wp;
    if ( isset( $wp->query_vars['customer-logout'] ) ) {
        wp_redirect( str_replace( '&', '&', wp_logout_url( wc_get_page_permalink( 'myaccount' ) ) ) );
        exit;
    }
}
add_action( 'template_redirect', 'bypass_woo_logout_confirmation' );
Bonus tip 2: Redirect user to the front page after logout
If you won’t use this code here below, your users will be redirected to the My account page. If you want them to be redirected to the front page instead, then add this code to the Code snippets.
add_action('wp_logout','logout_redirect');
function logout_redirect(){
    wp_redirect( home_url() );
    exit;
}