
In this video I’m going to show you 14 useful Woocommerce single product page hacks you can use in every store. If you would like to use those snippets here below then just add the ones you need inside your child theme’s functions.php file or better yet, use Code Snippets plugin. This way you’re not going to lose these modifications in case you’re switching your theme.
Also, take a look at the video tutorial here below and then it will probably be a bit easier to understand what is what.
Video: How to use Woocommerce Single Product Page Hacks
How to create and display custom product field?
First, let’s create a new Woocommerce single product custom field and let’s output it in the desired place. The end result will look like the one here below on the screenshot.
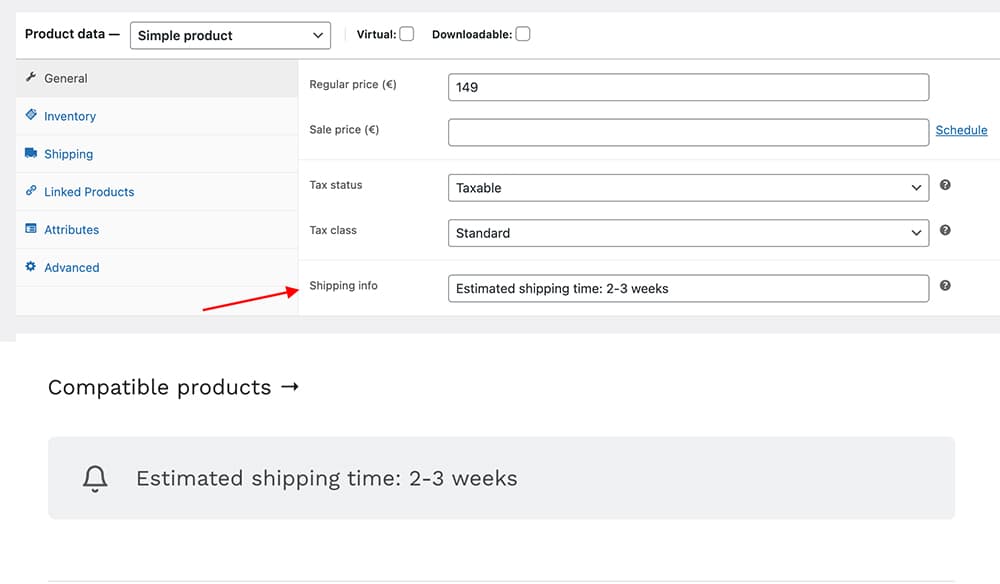
So, just grab this code and use it accordingly.
// Add custom field to Woocommerce backend under General tab
add_action( 'woocommerce_product_options_general_product_data', 'wpsh_add_text_field' );
function wpsh_add_text_field() {
    woocommerce_wp_text_input( array(
        'id'            => '_shipping_time',
        'label'         => __( 'Shipping info', 'woocommerce' ),
        'description'   => __( 'This is a custom field, you can write here anything you want.', 'woocommerce' ),
        'desc_tip'      => 'true',
        'type'          => 'text'
    ) );
}


// Save custom field values
add_action( 'woocommerce_admin_process_product_object', 'wpsh_save_field', 10, 1 );
function wpsh_save_field( $product ) {
    if ( isset( $_POST['_shipping_time'] ) ) {
        $product->update_meta_data( '_shipping_time', sanitize_text_field( $_POST['_shipping_time'] ) );
    }
}

// Display this custom field on Woocommerce single product pages
add_action( 'woocommerce_product_meta_end', 'wpsh_display_on_single_product_page', 10 );
function wpsh_display_on_single_product_page() {
    global $product;

    // Is a WC product
    if ( is_a( $product, 'WC_Product' ) ) {
        // Get meta
        $text = $product->get_meta( '_shipping_time' );
        // NOT empty
        if ( ! empty ( $text ) ) {
            echo '<div class="woocommerce-message">Estimated shipping time: ' . $text . '</div>';
        }
    }
}
// Display this custom field on Woocommerce archive pages
add_action( 'woocommerce_after_shop_loop_item', 'wpsh_display_on_archive_page', 10 );
function wpsh_display_on_archive_page() {
    global $product;
    // Is a WC product
    if ( is_a( $product, 'WC_Product' ) ) {
        // Get meta
        $text = $product->get_meta( '_shipping_time' );
        // NOT empty
        if ( ! empty ( $text ) ) {
            echo '<div class="custom-text">Estimated shipping time: ' . $text . '</div>';
        }
    }
}
How to create custom tab?
This snippet here below creates new custom Woocommerce single product tab and it contains text and contact form. Just replace the content as you like and you’re good to go.
add_filter( 'woocommerce_product_tabs', 'custom_tab' );
function custom_tab( $tabs ) {
	// Adds the new tab
	$tabs['form'] = array(
		'title' 	=> __( 'Send us an enquiry', 'woocommerce' ),
		'priority' 	=> 30,
		'callback' 	=> 'custom_tab_content'
	);
	return $tabs;
}
function custom_tab_content() {

	// The new tab content

	echo '<h4>Send us an enquiry</h4>';
	echo '<p>Lorem ipsum dolor sit amet consectetur adipiscing elit ultricies convallis volutpat, placerat proin scelerisque eget velit tellus at nibh risus. </p>';
	echo do_shortcode( '[fluentform id="1"]' );
}How to move Woocommerce related products and upsells product in a tab?
It’s easy. If you want to move Woocommerce related products in a tab then use this snippet.
/* Related products IN CUSTOM TAB */

// Remove related products from original location
remove_action( 'woocommerce_after_single_product_summary', 'woocommerce_output_related_products', 20);

// Create a new custom tab
add_filter( 'woocommerce_product_tabs', 'related_product_tab' );

function related_product_tab( $tabs ) {
$tabs['related-products'] = array(
   'title'    => __( 'Related products', 'woocommerce' ),
   'priority'    => 50,
   'callback'    => 'related_product_tab_content'
);
   return $tabs;
}

// Add related products inside new tab
function related_product_tab_content() {
woocommerce_output_related_products();
}If you want to move Woocommerce upsell products in a tab then use this snippet.
 /* UPSELLS IN CUSTOM TAB */

// Remove uplsells products from original location
remove_action( 'woocommerce_after_single_product_summary', 'woocommerce_upsell_display', 15 );

// Create a new custom tab

add_filter( 'woocommerce_product_tabs', 'upsells_product_tab' );

function upsells_product_tab( $tabs ) {
$tabs['upsells-products'] = array(
   'title'    => __( 'Compatible products', 'woocommerce' ),
   'priority'    => 50,
   'callback'    => 'upsells_tab_content'
);
   return $tabs;
}
// Add upsells inside new tab
function upsells_tab_content() {
woocommerce_upsell_display();
}How to scroll directly to Woocommerce product tab and open it automatically?
This code snippet here below adds links above add to cart button. If you click on the link it will scroll to the product tab and automatically opens it. If you’re using custom tabs then add a new link with the custom tab name.
add_action( 'woocommerce_single_product_summary', 'scroll_to_product_tab', 21 );

function scroll_to_product_tab() {

    global $post, $product;

    // LINK TO SCROLL TO DESC TAB
    if ( $post->post_content ) {
        echo '<p><a class="jump-to-tab" href="#tab-description">' . __( 'Read more', 'woocommerce' ) . ' →</a></p>';
    }

    // LINK TO SCROLL TO ADDITIONAL INFO TAB
    if ( $product && ( $product->has_attributes() || apply_filters( 'wc_product_enable_dimensions_display', $product->has_weight() || $product->has_dimensions() ) ) ) {
        echo '<p><a class="jump-to-tab" href="#tab-additional_information">' . __( 'Additional information', 'woocommerce' ) . ' →</a></p>';
    }
        // LINK TO SCROLL TO REVIEWS TAB
    if ( comments_open() ) {
        echo '<p><a class="jump-to-tab" href="#tab-reviews">' . __( 'Reviews', 'woocommerce' ) . ' →</a></p>';
    }
    ?>
        <script>
        jQuery(document).ready(function($){
            $('a.jump-to-tab').click(function(e){
                e.preventDefault();
                var tabhash = $(this).attr("href");
                var tabli = 'li.' + tabhash.substring(1);
                var tabpanel = '.panel' + tabhash;
                $(".wc-tabs li").each(function() {
                    if ( $(this).hasClass("active") ) {
                        $(this).removeClass("active");
                    }
                });
                $(tabli).addClass("active");
                $(".woocommerce-tabs .panel").css("display","none");
                $(tabpanel).css("display","block");
                $('html,body').animate({scrollTop:$(tabpanel).offset().top -150},'slow'); // Set your offset by changing -150 value
            });
        });
        </script>
    <?php
}How to create a direct link to your product tab?
Maybe you need to send a link with the specific product reviews to someone and isntead of sending him/her the product link you can send the link to the review tab itself. So, use this snippet here below and send the link in a form https://yoursite.com&/demo-product/#tab-reviews
If you want to link to some other tab then just replace #tab-reviews with the correct tab link.
function direct_link_to_product_tabs() {
	if( is_product() ) {
	?>
		<script type="text/javascript">
			jQuery(document).ready(function($) {

				if( window.location.hash ) {
					// Vars
					var tab = window.location.hash.replace('#', '');

					// Tabs
					$( 'li.description_tab' ).removeClass( 'active' );
					$( 'a[href="#' + tab + '"]' ).parent( 'li' ).addClass( 'active' );

					// Tabs content
					$( '#tab-description' ).hide();
					$( '#tab-' + tab.replace( 'tab-', '' ) ).show();
				}

				// when the tab is selected update the url with the hash
				$( '.tabs a' ).click( function() {
window.location.hash = 'tab-' + $(this).parent('li').attr("class").replace(' active', '').replace('_tab', '');
				});

			});
		</script>
	<?php
	}
}
add_action( 'wp_footer', 'direct_link_to_product_tabs', 30 );How to display “You save” for sale price?
Take a look at the screenshot here below. This is what these snippets are doing for you.

So, in order to make it work like that use this snippet.
function you_save_text_for_product() {
	global $product;

	// works for Simple and Variable type
	$regular_price 	= get_post_meta( $product->get_id(), '_regular_price', true ); // 36.32
	$sale_price 	= get_post_meta( $product->get_id(), '_sale_price', true ); // 24.99

	if( !empty($sale_price) ) {

		$saved_amount 		= $regular_price - $sale_price;
		$currency_symbol 	= get_woocommerce_currency_symbol();

		$percentage = round( ( ( $regular_price - $sale_price ) / $regular_price ) * 100 );
		?>
			<p class="you_save_price">You save: <?php echo $currency_symbol .''. number_format($saved_amount, 2, '.', ''); ?></p>
		<?php
	}

}
add_action( 'woocommerce_single_product_summary', 'you_save_text_for_product', 12 ); // hook priorityIf you would like to customize the look of it then take a look at the you_save_price CCS class. Now go to Customizer >> Additional CSS and add this small pies of CSS to customize it.
.you_save_price {
	background: #f9f9f9;
	padding: 10px;
	border: 1px dashed #ddd;
	width: 150px;
	font-size: 14px;
	font-weight: 600;
	margin-top: 10px;
}
Now, this code above shows saved amount only for simple products. If you would like to show it also for variable products, then add this piece of code.
// For product variations (on variable products)
add_filter( 'woocommerce_available_variation', 'variable_product_saving_amount', 10, 3 );
function variable_product_saving_amount( $data, $product, $variation ) {

    if( $variation->is_on_sale() ) {
        $saved_amount  = $data['display_regular_price'] - $data['display_price'];
        $percentage    = round( $saved_amount / $data['display_regular_price'] * 100 );

        $data['price_html'] .= '<p id="you_save_price">'. __("You Save") .': ' . wc_price($saved_amount) . ' ('.$percentage.'%)</p>';
    }
    return $data;
}How to add Back to category button on Woocommerce single product page?
This pieces of code will add Back to category button on Woocommerce single product page under the Meta block.
add_action ('woocommerce_share','add_back_product_category_button', 5);
function add_back_product_category_button(){

    // Get the product categories set in the product
    $terms = wp_get_post_terms( get_the_id(), 'product_cat' );

    // Check that there is at leat one product category set for the product
    if(sizeof($terms) > 0){
        // Get the first product category WP_Term object
        $term = reset($terms);
        // Get the term link (button link)
        $link = get_term_link( $term, 'product_cat' );

        // Button text
        $text = __('← Back to category','woocommerce') . ' <strong>' . $term->name . '</strong>';

        // Output
        echo '<div class="back-to-category"><a href="'.esc_url($link).'" title="'.$text.'" '.$term->slug.'">'.$text.'</a></div>';
    }
}If you woulkd like to customize this Woocommerce Back to category button then use this piece of CSS code.
.back-to-category {
	margin-top: 1.5em;
	border: 1px solid #ddd;
	border-radius: 50px;
	padding: 7px 20px;
	text-align: center;
	transition: border-color 0.5s ease;
}
.back-to-category:hover {
	border: 1px solid #1e1e1e;
}
How to change Woocommerce add to cart button text if product is in backorder?
I have had customers who are confused about the backorders and they haven’t realized that the product is out of stock and it need to be pre-ordered. Therefore I needed to change Woocommerce add to cart button text for backorder products. Now, if I combine it with the custom field (hack #1 above) then the end result will look like this:

Looks good, isn’t it? So, use this code snippet.
add_filter( 'woocommerce_product_single_add_to_cart_text', 'wc_ninja_change_backorder_button', 10, 2 );
function wc_ninja_change_backorder_button( $text, $product ){
	if ( $product->is_on_backorder( 1 ) ) {
		$text = __( 'Pre-order', 'woocommerce' );
	}
	return $text;
}

add_filter( 'woocommerce_product_add_to_cart_text', 'wc_ninja_change_backorder_button1', 10, 2 );
function wc_ninja_change_backorder_button1( $text, $product ){
    if ( $product->is_on_backorder( 1 ) ) {
        $text = __( 'Pre-order', 'woocommerce' );
    }
    return $text;
}How to add NEW badge for the Woocommerce products newer than 30 days?
This snippet here below will add NEW badge for the Woocommerce products that are newer than 30 days. If you want it to be more or less than 30 days then change Newness in days number.
// New badge
add_action( 'woocommerce_single_product_summary', 'new_badge', 5 );

function new_badge() {
   global $product;
   $newness_days = 30; // Newness in days
   $created = strtotime( $product->get_date_created() );
   if ( ( time() - ( 60 * 60 * 24 * $newness_days ) ) < $created ) {
      echo '<span class="itsnew">' . esc_html__( 'NEW', 'woocommerce' ) . '</span>';
   }
}Now let’s customize this Woocommerce NEW badge. Add this piece of CSS into Additional CSS box.
.itsnew {
	background: #f37b21;
	padding: 5px 10px;
	font-size: 12px;
	font-weight: 700;
	color: #fff;
}
How to add estimated delivery date and time on your Woocommerce single product page?
With the help of this snippet you will be able to add a estimated delivery date and time on your Woocommerce single product page. Take a look at the screenshot here below.

add_action('woocommerce_after_add_to_cart_button', 'delivery_estimate');

function delivery_estimate() {
    date_default_timezone_set('Europe/Tallinn');

    // if FRI/SAT/SUN delivery will be MON
    if (date('N') >= 5) {
        $del_day = date("l jS F", strtotime("next monday"));
        $order_by = "Monday";
    }

    // if MON/THU after 4PM delivery will be day after tomorrow
    elseif (date('H') >= 16) {
        $del_day = date("l jS F", strtotime("tomorrow + 2 days"));
        $order_by = "day after tomorrow";
    }

    // if MON/THU before 4PM delivery will be TOMORROW
    else {
        $del_day = date("l jS F", strtotime("tomorrow"));
        $order_by = "today";
    }

    $html = "<br><div class='woocommerce-message' style='clear:both'>Order by 4PM {$order_by} for delivery on {$del_day}</div>";

    echo $html;
}How to show estimated delivery date for specific category?
If you need to show estimated delivery date for specific product category then you need to add two lines of code. So, add this line just below your function name row. Also, you would need to add } sign to the last line.
if ( has_term( 'furniture', 'product_cat' ) ) { // Change "furniture" with your own category slugJust replace “furniture” slug with your own product category slug. So, this is the full code that will show estimated delivery date for Furniture category.
add_action( 'woocommerce_after_add_to_cart_form', 'specific_category_delivery_estimate' );

function specific_category_delivery_estimate() {
  if ( has_term( 'furniture', 'product_cat' ) ) { // Change "furniture" with your own category slug
   date_default_timezone_set( 'Europe/Tallinn' );

   // if FRI/SAT/SUN delivery will be MON
   if ( date( 'N' ) >= 5 ) {
      $del_day = date( "l jS F", strtotime( "next tuesday" ) );
      $order_by = "Monday";
   }

   // if MON/THU after 4PM delivery will be day after tomorrow
   elseif ( date( 'H' ) >= 16 ) {
      $del_day = date( "l jS F", strtotime( "tomorrow + 1 day" ) );
      $order_by = "tomorrow";
   }

   // if MON/THU before 4PM delivery will be TOMORROW
   else {
      $del_day = date( "2 jS F", strtotime( "tomorrow" ) );
      $order_by = "today";
   }

   $html = "<br><div class='woocommerce-message' style='clear:both'>Order by 4PM {$order_by} for delivery on {$del_day}</div>";

   echo $html;
}
}How to show estimated delivery date for specific category or product?
Now, if you need to show this on a specific product page then it works similarly as with the categories byt this time add this row instead and replace “426” with your own product ID.
if ( is_single( '426' ) ) { // Replace "426" with your own product IDAnd the full code for a specific product is this.
add_action( 'woocommerce_after_add_to_cart_form', 'specific_product_delivery_estimate' );

function specific_product_delivery_estimate() {
 if ( is_single( '426' ) ) {
   date_default_timezone_set( 'Europe/Tallinn' );

   // if FRI/SAT/SUN delivery will be MON
   if ( date( 'N' ) >= 5 ) {
      $del_day = date( "l jS F", strtotime( "next tuesday" ) );
      $order_by = "Monday";
   }

   // if MON/THU after 4PM delivery will be day after tomorrow
   elseif ( date( 'H' ) >= 16 ) {
      $del_day = date( "l jS F", strtotime( "tomorrow + 1 day" ) );
      $order_by = "tomorrow";
   }

   // if MON/THU before 4PM delivery will be TOMORROW
   else {
      $del_day = date( "2 jS F", strtotime( "tomorrow" ) );
      $order_by = "today";
   }

   $html = "<br><div class='woocommerce-message' style='clear:both'>Order by 4PM {$order_by} for delivery on {$del_day}</div>";

   echo $html;
}
}How to add Woocommerce product enquiry form?
This snippet here adds a button under your Add to cart button. If you click on the button then the contact form opens up. Just replace the contact form shortcode inside this snippet (line 6).
add_action( 'woocommerce_single_product_summary', 'enquiry_form', 30 );
function enquiry_form() {

echo '<button type="submit" id="trigger_cf" class="button alt" style="margin-bottom: 20px;">Send us your enquiry</button>';
echo '<div id="product_inq" style="display:none">';
echo do_shortcode('[your-shortcode-here]');
echo '</div>';
}
add_action( 'woocommerce_single_product_summary', 'enquiry_form_1', 40);
function enquiry_form_1() {
  ?>
    <script type="text/javascript">
        jQuery('#trigger_cf').on('click', function(){
        if ( jQuery(this).text() == 'Send us your enquiry' ) {
                    jQuery('#product_inq').css("display","block");
            jQuery("#trigger_cf").html('Close');
        } else {
            jQuery('#product_inq').hide();
            jQuery("#trigger_cf").html('Send us your enquiry');
        }
        });
    </script>
    <?php
}
You can also use conditionals. For example, for the Clothing category products I’m showing one form and for all other products another form. just replace the category slug inside “clothing” part of the code.
add_action( 'woocommerce_single_product_summary', 'enquiry_form', 30 );
function enquiry_form() {
	if ( has_term( 'clothing', 'product_cat' ) ) {
echo '<button type="submit" id="trigger_cf" class="button alt">Send us your enquiry</button>';
echo '<div id="product_inq" style="display:none">';
echo do_shortcode('[fluentform id="1"]');
echo '</div>';
} else {
echo '<button type="submit" id="trigger_cf" class="button alt" style="margin-bottom: 20px;">Send us your enquiry</button>';
echo '<div id="product_inq" style="display:none">';
echo do_shortcode('[fluentform id="1"]');
echo '</div>';
}
}
add_action( 'woocommerce_single_product_summary', 'enquiry_form_1', 40);
function enquiry_form_1() {
  ?>
    <script type="text/javascript">
        jQuery('#trigger_cf').on('click', function(){
        if ( jQuery(this).text() == 'Send us your enquiry' ) {
                    jQuery('#product_inq').css("display","block");
            jQuery("#trigger_cf").html('Close');
        } else {
            jQuery('#product_inq').hide();
            jQuery("#trigger_cf").html('Send us your enquiry');
        }
        });
    </script>
    <?php
}
How to disable (grey out) selection of out-of-stock variation?
For your customers it is much easier to choose only the variations that are available. Therefore, I’ll show you how to disable /grey out) selection of out-of-stock product variations.
add_filter( 'woocommerce_variation_is_active', 'disable_variations_out_of_stock', 10, 2 );

function disable_variations_out_of_stock( $is_active, $variation ) {
    if ( ! $variation->is_in_stock() ) return false;
    return $is_active;
}How to include a product thumbail alongside the name and price of Woocommerce grouped products?
This small piece of code will add a product thumbnail for the Woocommerce product grouped products table. If you wan to change the image size then just modify the 40, 40 part.
add_action( 'woocommerce_grouped_product_list_before_price', 'woocommerce_grouped_product_thumbnail' );

function woocommerce_grouped_product_thumbnail( $product ) {
    $image_size = array( 40, 40 );  // array( width, height ) image size in pixel
    $attachment_id = get_post_meta( $product->id, '_thumbnail_id', true );
    ?>
    <td class="label">
        <?php echo wp_get_attachment_image( $attachment_id, $image_size ); ?>
    </td>
    <?php
}How to remove Woocommerce reviews tab?
Also an easy task. Use this snippet here to remove Woocommerce reviews tab.
add_filter( 'woocommerce_product_tabs', 'woo_remove_product_tabs', 98 );

function woo_remove_product_tabs( $tabs ) {
    unset( $tabs['reviews'] ); // Remove the reviews tab
    return $tabs;
}How to hide Woocommerce product price for out of stock products?
This snippet here below hides Woocommerce product price for out of stock products
add_filter( 'woocommerce_get_price_html', 'wpsh_hide_price', 9999, 2 );

function wpsh_hide_price( $price, $product ) {
   if ( is_admin() ) return $price; // BAIL IF BACKEND
   if ( ! $product->is_in_stock() ) {
      $price = apply_filters( 'woocommerce_empty_price_html', '', $product );
   }
   return $price;
}